Showing posts with label Main Dishes. Show all posts

Thursday, February 7, 2013

Nachos

When we get hungry for something spicy, crunchy, tasty and quick, we often turn to our individual Nachos.  There are usually two of us but if there are more, it is very easy to adjust this recipe. Most of these ingredients are always in my fridge or pantry.


 Nachos

Tortilla Chips (as many as you want)
1 cup shredded cheese (any kind you want)
1/2 tomato, diced
1/4 cup cilantro, chopped
2 tablespoons nacho rings, chopped (or as many as you like)
1 avocado, chopped
2 wedges of fresh lime, optional (but so good)
2 green onions, chopped - greens and all
1/2 cup prepared salsa
1/2 cup sour cream

Prepare all of your ingredients on a platter or cutting board.  

With a square piece of foil, place your hand in the center and pull up the corners.  This will form a ‘bowl’ for your chips.  Fill each foil ‘bowl’ with as many tortilla chips as you like.  Sprinkle cheese on top of the chips.  Turn on your broiler and place the rack 8 - 10 inches below the element.  Place your chips and cheese under the broiler for about 2 minutes, or until the cheese starts to melt.  Watch those chips because they will start to turn brown fast.  Remove the foil ‘bowls’ and top with desired toppings.  Squeeze the fresh lime over the top of everything.  

You can always add any of your own favorite toppings!  


Just heat chips and cheese,
and add the toppings of your 
choice.  

Friday, January 18, 2013

Chili - quick and easy

As we grow up and our tastes mature and change, we develop guide lines on certain foods.  I remember things from my younger years that just don't taste the same now.  Did they ever taste the way I remember them or are things really different?  The Chili I had when I was growing up came from a local burger shop.  They made their own chili and it had no beans in it.  I now prefer my chili with beans.  I don't remember ever even knowing that there were black beans out there.  A chili was usually a bell pepper, not the yummy and spicy chilies that are now available at the local supermarkets.  This recipe is one of those basics that I made when my sons were growing up, with a couple of changes for the times.  I usually use red bell pepper ( because I don't care for the taste of the green) and I really like to use black beans or pinto beans and for me, I like a squeeze of half a lime in there.  I like to top my chili with a dab of sour cream and a sprinkle of chopped fresh cilantro.  Hubby John likes grated cheese and chopped green onion on his.  I hope you enjoy this quick and easy recipe.


                                       Chili - quick and easy

2 Tablespoons Canola Oil
1 clove garlic, minced
1/2 cup chopped onion
1 small jalapeno pepper, cleaned and diced
1/2 med. bell pepper, chopped (red or green)
1 pound lean ground beef (or turkey)
1 15 ounce can kidney beans, juice and all (or black beans or pinto peans)
2  8 ounce cans tomato sauce
1/2 teaspoon salt
3 teaspoons chili powder 

In a large pot, heat oil.  Cook and stir garlic, onion, jalapeno, bell pepper and meat until slightly browned.  Stir in beans with their liquid, tomato sauce, salt and chili powder.  Simmer over low heat, stirring occasionally, until chili is desired thickness - 30 to 45 minutes.  

Makes 4 servings

Thursday, January 3, 2013

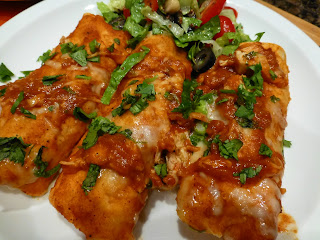
Enchiladas

Christmas and New Year's are over and it's time to get back to normal (if there is such a thing) in Grammy's Kitchen.  John and I both wanted something spicy a couple nights ago so I pulled out the Enchilada recipe and used some rotisserie chicken that had been thrown into the freezer before Christmas.  It was so good, just what we wanted.  I hope you enjoy this recipe and it satisfies your hunger for something spicy, of course, you can tame it down or spice it up some more.


                                       ENCHILADAS

Sauce:
2 tablespoons minced onion (can be dried)
1 clove garlic, minced
2 tablespoons vegetable oil
1 tablespoon flour
2   8 oz. cans tomato sauce
2-4 teaspoons chili powder (to taste, I go for the 4 and spicy)
1/2 teaspoon ground cumin
1/4  teaspoon salt
1/4 teaspoon pepper
1/2 teaspoon Tobasco Sauce (to taste)
1 cup water

Cook onion and garlic in oil to soften.  Stir in flour and cook for 2 minutes.  Stir in remaining ingredients being careful to whisk it well and not get lumps.  Simmer until med. thick. You can add more water if you like a thinner sauce.

Filling:
1 pound ground beef, crumbled and browned 
1  4 oz. can Ortega chiles, drained
2-3 cups Monterey Jack Cheese, shredded
12 corn tortillas (you can use flour if you prefer)
2 green onions, chopped
1/2 cup fresh cilantro, chopped

Add the chiles and 1/2 cup of the enchilada sauce to the cooked meat.

Use a small amount of oil in fry pan and lightly fry each tortilla to make them pliable.  Dip tortillas into sauce and fill each tortilla with the meat mixture and a little cheese and whatever other fillings you like (onions, olives, etc.)  Roll up.  Arrange in Pam sprayed baking dish or on a foil lined cookie sheet.  Pour on remaining sauce and sprinkle with remaining grated cheese.  Sprinkle green onions on top and heat in oven at 375 degrees for 20 - 30 minutes or until hot and bubbly. Now sprinkle with the fresh cilantro.  I serve this with a green salad or sometimes with refried beans or Mexican rice.  This recipe freezes beautifully!

Serves 4-6

Variation:

Fill with chopped cooked chicken, turkey or just cheese and Ortega chiles.  I really like to use the rotisserie chickens from the grocery store and leftover turkey is terrific. 


Wednesday, January 2, 2013

Lobster

 My husband, John, and I love to eat lobster tail on special occasions. After many years of trying to order it at restaurants, paying the price and being disappointed we came up with this method of preparing it at home.  First of all, I want to say that we only buy the lobster's tails.  Here in North-Central California, we pay around $20 per pound at our local Costco store.  We like them around the 1/2 pound size and we look for the color of the meat to be as white as possible.  They are usually frozen, so we thaw them in the fridge over night.  John does the hardest job - getting the lobster out of the shell.  We found that cooking the lobster out of the shell and under the broiler makes it easier to control the doneness, if it is too done it will be chewy. I like to think of the lobster tails as very large prawns.  I like my prawns and lobster to be done but succulent.  That means you don't want to over cook it!  The first thing I do is start soaking 2 wooden skewers per lobster tail in water, so that they don't burn when you put them under the broiler.


This is the presentation we like!


And now, for the how to.............

After thawing and rinsing the lobster tail, use kitchen shears to carefully cut both sides of the membrane - on the bottom side of the tail.

Use your fingers to grab this membrane and carefully pull it away from the tail. 

Reach in, under the shell, and gently pull the lobster meat away from the shell. 

Remove the meat completely from the shell.

Use the shears to trim any black 'hanger onners' from the side of the meat.  Now, insert the soaked wooden skewers into the lobster meat.  Leave a space between the two skewers.

Line a baking dish with foil and spray it lightly with Pam.  Brush melted butter on the lobster meat, squeeze on some fresh lemon juice and season lightly with season salt.  Place meat approximately 6 inches under the broiler element and cook for 5 minutes on each side.

After you have cooked it for 5 minutes on both sides, remove pan from oven and with a sharp knife, cut the lobster between the skewers - not quite all the way through.  The lobster meat will 'lay' open and allow you to see how done it is in the center.  See, it doesn't look quite done in the center.  Return it under the broiler and watch it finish cooking just until the center is solid white.  You want the meat to be done but not overcooked.    

This is what you want the lobster meat to look like!  Juicy and succulent, but done!  Now, use a twisting, turning motion on each of those wooden skewers and remove them from the lobster meat.  Serve your lobster with lemon wedges and melted butter.

Sunday, December 23, 2012

Prime Rib - Grammy's Way

I don't remember where I heard about a 45-45-45 way of cooking prime rib, but I do know it made a mess in my oven.  I was told to cook my prime rib at 450˚ for 45 minutes, then 350˚ for 45 minutes and then turn the oven off and tent my prime rib with foil - loosely for another 45 minutes - outside the oven.  So next time, I made poor John (my husband) go out in the cold and turn on the grill.  We cooked our prime rib for 45 minutes at 450˚ and then brought the meat in to the kitchen oven and cooked it for 45 minutes at 350˚ and then checked it with our handy dandy meat thermometer  - it registered about 135˚.  Then, we tented it loosely with foil (outside of the oven) for another 45 minutes.  After that it registered about 145˚ and believe me it was wonderful! And, my oven was clean, which made me very happy :)  !   We like our beef cooked to med. rare so if you like it more done, be sure you use that meat thermometer and if you like it a little more done, turn off the oven after the 45 minutes at 350˚, tent with foil loosely but leave it in the turned off, but warm oven.  This seems to work on different sizes of roasts that I have made.  The center cuts are more rare but if you want more done, simply slice your meat and put it back in the oven to keep it warm.  Better to have a more rare prime rib than one that is too done - in my opinion.  I hope this works for you.  OK, here's just a bit of extra info for you.  When you purchase your rib roast, try to get the butcher to cut it off the bone or just use a sharp knife and do it yourself at home.  Season your roast with your favorite meat seasoning.  I like to rub in a mixture of salt, pepper and crushed garlic.  When you put it on the outside grill for the first 45 minutes, John suggests you put it on a wire rack, with the meat loosely sitting on the bones.  If you put this into one of those throw-away aluminum pans, you will avoid the possibility of flame ups from the dripping fat.  Add a little water to the bottom of that pan and you will be able to save the juice for au jus sauce to serve along side the slices.


45 minutes on the grill at 450˚, 45 minutes in the oven at 350˚.  Turn the oven off.  Tent the Prime Rib loosely with foil and let it sit on the counter for 45 minutes.  Works for me!

                                         
                         A beautiful Prime Rib dinner for 2......

Monday, December 17, 2012

Lemon Chicken Rustica


A couple of years ago we went to visit our youngest son and his family at Christmas time.  I came prepared to fix dinner one night, with the stipulation that the grandkiddos helped.  Well, our grandson (then 10 years old) said he didn't want to cook.  I told him I had a very special assignment for him.  Well, when I explained that the chicken needed to be pounded to just the right thickness he became interested and did an excellent job.  He and his sister both helped me and enjoyed the process and there wasn't a single question about if they were going to eat it or not. 

We are so fortunate to have a very prolific Meyer Lemon Tree in our back yard and the fruit ripens in December.  We keep her pruned but each year she produces more and more fruit.  This year we have picked over 300 lemons.  I want to share my recipe for Lemon Chicken Rustica that my family really likes.  First, though, I want to introduce you to our tree.

Meet Meyer Lemon!


                         LEMON CHICKEN RUSTICA

4 Boneless, Skinless Chicken Breast Halves 
1 teaspoon Dried Thyme
1 small bunch Fresh Thyme
Salt and freshly ground Black Pepper
4 tablespoons Olive Oil
1/4 cup Flour
1 medium Red Onion, thinly sliced
1/2 cup White Wine, optional (you can use more broth)
1 1/2 cup Chicken Broth
1 1/2 Lemons, juiced  (about 3/4 cup)
1 tablespoon Butter  
 2 tablespoons Capers, rinsed under water (these are optional)

Cut chicken breasts in half, cross ways (butterflied, cut all the way through). Place pieces flat in a plastic bag or between 2 pieces of plastic wrap and pound with the bottom of a heavy fry pan to make pieces the same thickness, about 1/2”. Season chicken pieces with dried thyme and salt and pepper.  Heat the oil in a large sauté pan. Dredge the chicken in flour and add to the hot oil and sauté until just cooked through and browned slightly on both sides. Place chicken on platter.

In the same sauté pan, over medium heat, cook the onions and fresh thyme until onions are soft, then remove them from pan to the platter.

In a measuring cup, measure the wine, if you use it, and the broth and the lemon juice. Turn the heat to high and deglaze the pan with the liquids then add the rinsed capers.  Cook sauce on high until it reduces by about half and is beginning to thicken.  Remove the pan from the heat and finish the sauce by whisking in the butter. Season with salt and pepper, to taste. Slide the chicken and onions into the sauce for just long enough to warm them up.

Serve over cooked spinach, pasta or rice. 

Makes 6 generous servings 

Monday, November 26, 2012

Stuffed Portabella Mushrooms


Today in my kitchen I would like to share a recipe with you for a Stuffed Portabella Mushroom that is a terrific main event dish.  


I first made stuffing for a turkey when I was 17 years old and it was for a school project.  I planned and prepared Thanksgiving dinner for 9 people.  This was quite an undertaking but at the time I didn’t think about it, I just did it.  The only thing that made me a little nervous was that I included my boyfriend (now my husband) and his parents.  I got an A+ on the project.  With Betty (that’s my Betty Crocker Cookbook) by my side, I could make anything in the kitchen.  Over the years I have altered and adjusted many recipes that originated in Betty’s book. Here is my present stuffing recipe...

                                    BREAD STUFFING 

16  ounces dry stuffing croutons (approximately)
1/2 cup margarine
1 large onion, chopped fine
3 stalks celery, chopped fine
1 teaspoon poultry seasoning
1 Tablespoon chopped fresh parsley
2 15 ounce cans chicken or vegetable broth
salt and pepper to taste

Melt margarine in large fry pan, sauté onion and celery until yellow.  Add the poultry seasoning, parsley and broth.  Combine croutons lightly with mixture and use to stuff turkey, chicken or mushrooms.  


Since our oldest son and his family are vegetarians I use my stuffing to stuff large Portabella Mushrooms.  I wipe them clean and remove the black 'gills' .  Then rub them with olive oil, mound up the stuffing and  put them in the oven at 350˚ for around 30 minutes.  That should be long enough to make the stuffing crispy on top, cook the mushrooms slightly and finish up dinner. I round out our Thanksgiving with our family favorite side dishes and, of course, pumpkin pie for dessert.